作者:Adam Freeman 翻译:陈广 日期:2018-8-28
本章我将演示如何对 MVC 应用程序进行单元测试。单元测试是一种测试形式,在这种测试中,各个组件与应用程序的其余部分隔离开来,因此可以对它们的行为进行彻底的验证。ASP.NET Core MVC 的设计使创建单元测试变得容易,而 Visual Studio 对多种单元测试框架提供了支持。我将向您展示如何设置单元测试项目,解释如何安装最流行的测试框架之一,并描述编写和运行测试的过程。表7-1为本章摘要。
决定是否进行单元测试
能够轻松地执行单元测试是使用 ASP.NET Core MVC 的好处之一,但它并不适合每个人,这点我无意假装。
我喜欢单元测试,并将它用于我的项目之中,但并非所有,也并非你想象的那样始终如一。我倾向于为我所知很难编写的特性和功能编写单元测试,它们很可能是部署中的 bug 来源。在这种情况下,单元测试有助于构建如何实现所需要功能的最佳想法。我发现,仅仅想一下我需要测试的东西,就会产生出关于潜在问题的想法,而且这是在开始处理实际的 bug 和缺陷之前。
也就是说,单元测试是一种工具,而不是一种宗教,只有您知道需要进行多少测试。如果您认为单元测试没有用,或者您有更适合的一套方法,那就不要仅仅因为它很流行就需要进行测试。(然而,如果没有更好的方法,而且根本没有进行测试,那么可能会让用户找到 bug,这并不理想。进行单元测试并不是必需的,但您真的应该考虑做一些测试。)
如果您以前没有使用过单元测试,那么我鼓励您尝试一下,看看它是如何工作的。如果您不是一个单元测试的粉丝,那么您可以跳过这一章,转到第8章,在第8章中,我开始构建一个更现实的 MVC 应用程序
表 7-1:本章摘要
| 问题 | 解决方案 | 清单 |
|---|---|---|
| 创建单元测试 | 创建一个单元测试项目,安装测试包并添加包含测试的类 | 5,6 |
| 隔离用于单元测试的组件 | 使用接口分离应用程序组件,并在单元测试中使用具有受限测试数据的假实现 | 7-14 |
| 使用不同的数据值运行相同的 xUnit 测试 | 使用参数化单元测试或从方法或属性获取测试数据 | 15-17 |
| 简化创建假测试对象的过程 | 使用模拟框架 | 18-19 |
本章将继续使用第6章中创建的 WorkingWithVisualStudio 项目。并增加在存储库中创建新Product对象的支持。
我使用本章的内置标签助手之一来为一个 anchor 元素设置href属性。我在第23、24和25章详细解释了标签助手是如何工作的,但是为了简单起见,我创建了一个 view imports 文件,右键单击 Views 文件夹,从弹出菜单中选择【添加】➤【新建项】,并从【ASP.NET】类别中选择【Razor 视图导入】模板。Visual Studio 将文件名自动设置为 _ViewImports.cshtml,单击【添加】按钮并创建文件,添加如清单7-1所示的语句。
清单 7-1:Views 文件夹下的 _ViewImports.cshtml 文件的内容
@addTagHelper *, Microsoft.AspNetCore.Mvc.TagHelpers
此语句启用了内置标签助手,包括我在 Index 视图中马上要使用的。我可以在项目中通过添加using语句导入命名空间,但是视图不是本章示例应用程序的重要部分,使用命名空间引用模型类型也不是问题。
第一步是在 Home 控制器中添加 actions,用于渲染输入数据以及从浏览器接收数据的视图,如清单7-2所示。这些 action 遵循我在第2章使用以及在第17章详细解释的模式。
清单 7-2:Controllers 文件夹下的 HomeController.cs 文件,添加 Action 方法
using Microsoft.AspNetCore.Mvc;
using WorkingWithVisualStudio.Models;
using System.Linq;

namespace WorkingWithVisualStudio.Controllers
{
    public class HomeController : Controller
    {
        SimpleRepository Repository = SimpleRepository.SharedRepository;
        public IActionResult Index() => View(Repository.Products
            .Where(p => p?.Price < 50));
        [HttpGet]
        public IActionResult AddProduct() => View(new Product());
        [HttpPost]
        public IActionResult AddProduct(Product p)
        {
            Repository.AddProduct(p);
            return RedirectToAction("Index");
        }
    }
}
为允许用户创建一个新的产品,我在 Views/Home 文件夹下创建了一个名为 AddProduct.cshtml 的 Razor 视图。此文件名和位置按约定对应于由 Home 控制器的AddProduct方法渲染的默认视图。清单7-3显示了新视图的内容,它依赖于我在第6章使用 Bower 加入项目的 Bootstrap 包。
清单 7-3:Views/Home 文件夹下的 AddProduct.cshtml 文件的内容
@model WorkingWithVisualStudio.Models.Product
@{ Layout = null; }

<!DOCTYPE html>
<html>
<head>
    <meta name="viewport" content="width=device-width" />
    <title>Working with Visual Studio</title>
    <link rel="stylesheet" href="/lib/bootstrap/dist/css/bootstrap.min.css" />
</head>
<body class="p-2">
    <h3 class="text-center">Create Product</h3>
    <form asp-action="AddProduct" method="post">
        <div class="form-group">
            <label asp-for="Name">Name:</label>
            <input asp-for="Name" class="form-control" />
        </div>
        <div class="form-group">
            <label asp-for="Price">Price:</label>
            <input asp-for="Price" class="form-control" />
        </div>
        <div class="text-center">
            <button type="submit" class="btn btn-primary">Add</button>
            <a asp-action="Index" class="btn btn-secondary">Cancel</a>
        </div>
    </form>
</body>
</html>
此视图包含了一个 HTML 表单,它使用 HTTP POST 请求向 Home 控制器的AddProduct action 发送Name和Price值。内容的样式使用了 Bootstrap CSS 包。
最后的准备步骤是修改 Index 视图,让它包含一个到新表单的链接,如清单7-4所示。我还借此机会删除了我在上一章中使用的 JavaScript 文件,用 Bootstrap 替换了自定义的 CSS 样式表,并将其应用于视图中的 HTML 元素上。
清单 7-4:Views/Home 文件夹下的 Index.cshtml 文件,更新内容
@model IEnumerable<WorkingWithVisualStudio.Models.Product>
@{ Layout = null; }

<!DOCTYPE html>
<html>
<head>
    <meta name="viewport" content="width=device-width" />
    <title>Working with Visual Studio</title>
    <link rel="stylesheet" href="/lib/twitter-bootstrap/css/bootstrap.min.css" />
</head>
<body class="p-1">
    <h3 class="text-center">Products</h3>
    <table class="table table-bordered table-striped">
        <thead>
            <tr><td>Name</td><td>Price</td></tr>
        </thead>
        <tbody>
            @foreach (var p in Model)
            {
                <tr>
                    <td>@p.Name</td>
                    <td>@($"{ p.Price:C2}")</td>
                </tr>
            }
        </tbody>
    </table>
    <div class="text-center">
        <a class="btn btn-primary" asp-action="AddProduct">
            Add New Product
        </a>
    </div>
</body>
</html>
如果运行示例,您将看到拥有新样式的内容以及【Add New Product】按钮,它导向数据输入表单。提交表单将向存储库添加一个新的Product对象,并重定向浏览器,以便显示初始的应用程序视图,如图7-1所示。
提示:请记住此示例的存储库仅在内存中存放对象,这意味着应用程序重启后,所有新创建的新产品都会丢失。
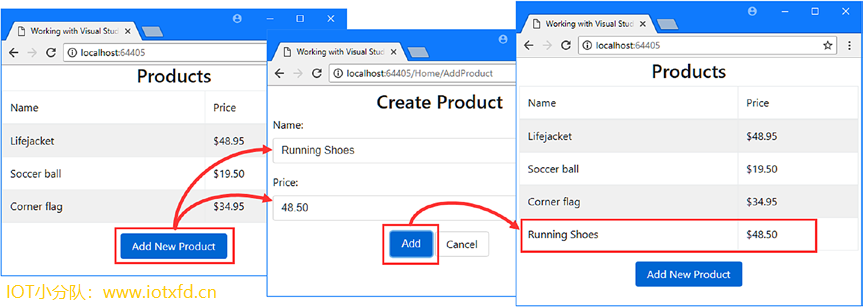 图7-1 运行示例应用程序
单元测试用于验证应用程序中某个组件和特性的行为,ASP.NET Core 和 MVC 框架的设计使为 Web 应用程序设置和运行单元测试尽可能容易。在下面的部分中,我将解释如何在 Visual Studio 中建立单元测试,并演示如何为 MVC 应用程序编写单元测试。我还介绍了一些使单元测试更简单、更可靠的有用工具。
有一系列不同的单元测试包可供使用。我在本书中使用的包称为 xUnit.net;之所以选择它,是因为它与 Visual Studio 有很好地集成,而且微软团队使用它来编写 ASP.NET Core 的单元测试。表7-2对 xUnit.net 作了简要介绍。
注意:单元测试中的每一件事都是个人偏好的问题,也是一个产生激烈分歧的主题。有些开发人员不喜欢将他们的单元测试与应用程序代码分开,他们更喜欢在同一个项目中,甚至在同一个类文件中定义测试。我在这里描述的方法是常用的,也是我遵循的方法,但是如果感觉不对,您应该尝试不同的测试风格,直到找到自己喜欢的东西为止。
表 7-2:xUnit.net 简要介绍
| 问题 | 回答 |
|---|---|
| 它是什么? | xUnit.net 是一个单元测试框架,可用于测试 ASP.NET Core MVC 应用程序 |
| 它为何有用? | xUnit 是一个易于编写的测试框架,可以轻松地集成到 Visual Studio 中 |
| 如何可使用? | 测试被定义为用Fact或Theory特性注释的方法。在方法体中,使用Assert类定义的方法将预期的测试结果与实际发生的结果进行比较。 |
| 是否有任何缺陷或限制? | 单元测试的主要缺陷是不能有效地隔离被测试的组件。参考“为单元测试隔离组件”这一节获取更为详细的信息。xUnit.net 特有的最大问题是缺乏文档。在http://xunit.github.io上有一些基本信息可用,但是高级使用需要一些尝试和错误。 |
| 有没有别的选择? | 有很多测试框架可用。两种流行的替代品是 MSTest(来自微软)和 NUnit |
对于 ASP.NET Core 应用程序,您通常创建一个单独的 Visual Studio 项目来保存单元测试,每个测试都被定义为 C# 类中的一个方法。使用单独的项目意味着在布署应用程序时不会连同测试一起布署。
要创建测试项目,在【解决方案资源管理器】中右键单击【解决方案"WorkingWithVisualStudio"】项,并在弹出的菜单中选择【添加】➤【新建项目】。在【Visual C#】➤【Web】➤【.NET Core】类别中选择【xUnit 测试项目(.NET Core)】模板,如图7-2所示。
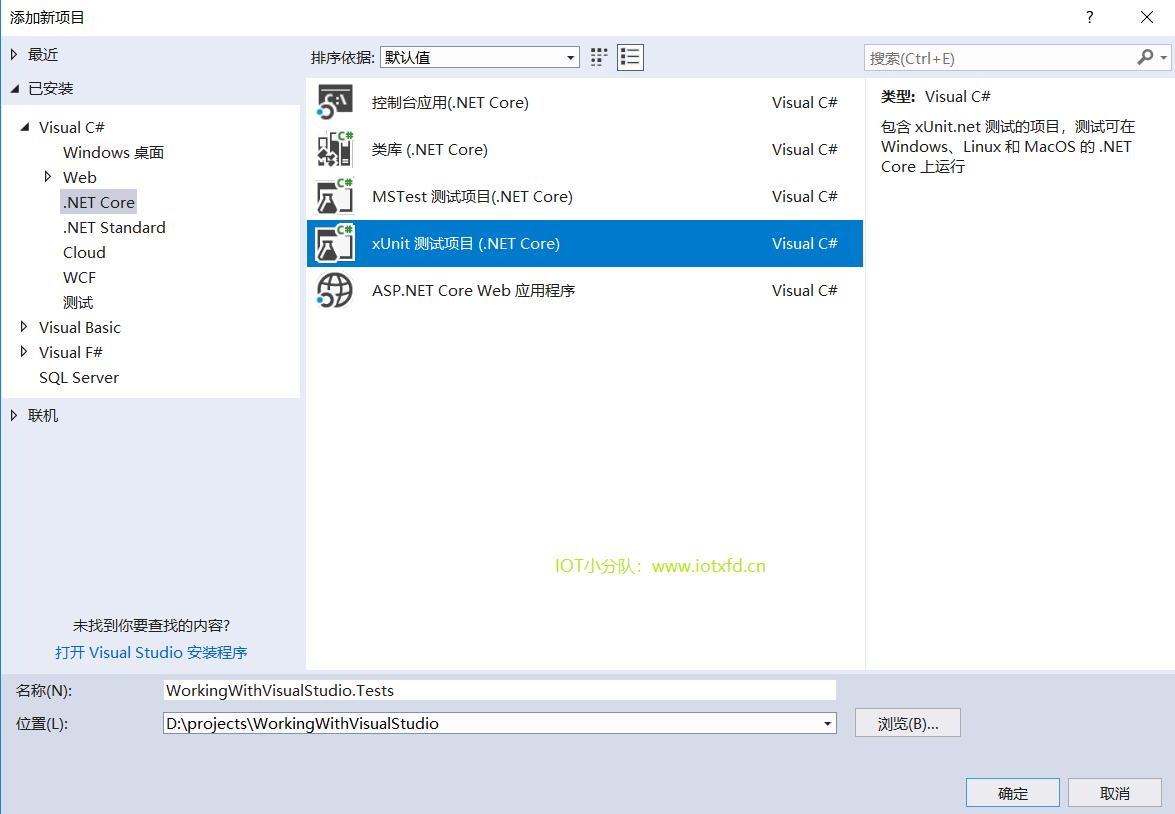 图7-2 选择单元测试项目模板
警告:确保选择了正确的项目模板。Visual Studio 提供了多个具有相似名称的测试项目模板。
按照惯例单元测试项目应命名为
Visual Studio 为测试项目添加了一个 C# 类,这会混淆之后示例的结果。在WorkingWithVisualStudio.Tests 项目上右键单击 UnitTest1.cs 文件,从弹出菜单中选择【删除】。在对话框中单击【确定】,Visual Studio 将删除类文件。
要使主项目中的类可用于测试,右键单击【解决方案资源管理器】中的【WorkingWithVisualStudio.Tests】项,然后从弹出菜单中选择【添加】➤【引用】。
在【项目】➤【解决方案】类别中勾选【WorkingWithVisualStudio】项,如图7-3所示。
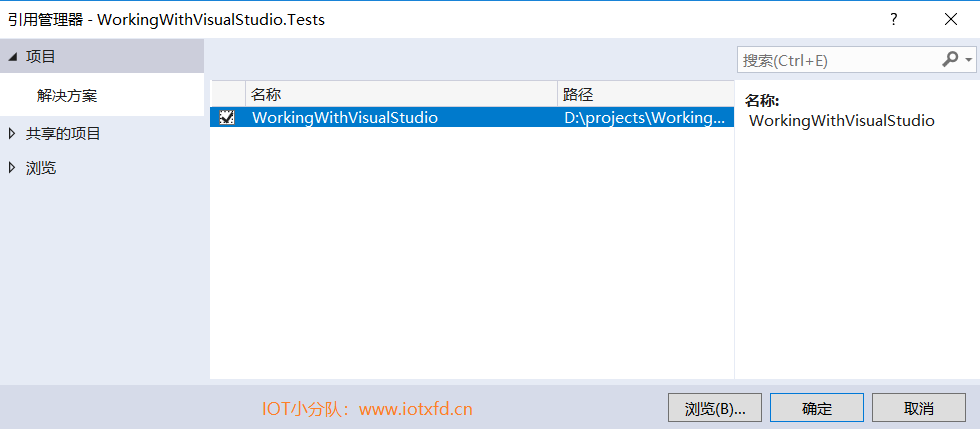 图7-3 创建应用程序项目引用
单击【确定】按钮以创建对应用程序项目的引用。您可能会在【解决方案资源管理器】中的测试项目的【依赖项】上看到一个工作图标,但是一旦构建了这些项目,这个图标就会消失。
现在所有准备工作都已完成,我可以编写一些测试了。首先,我在 WorkingWithVisualStudio.Tests 项目中添加了一个名为 ProductTests.cs 的类文件,并定义了清单7-5所示的类。这是一个简单的类,但它包含了开始单元测试所需的一切。
注意:
CanChangeProductPrice方法包含了一个有意的错误。我稍后会在本节中解析。
清单 7-5:WorkingWithVisualStudio.Tests 文件夹下的 ProductTests.cs 文件的内容
using WorkingWithVisualStudio.Models;
using Xunit;
namespace WorkingWithVisualStudio.Tests
{
    public class ProductTests
    {
        [Fact]
        public void CanChangeProductName()
        {
            // Arrange
            var p = new Product { Name = "Test", Price = 100M };
            // Act
            p.Name = "New Name";
            //Assert
            Assert.Equal("New Name", p.Name);
        }
        [Fact]
        public void CanChangeProductPrice()
        {
            // Arrange
            var p = new Product { Name = "Test", Price = 100M };
            // Act
            p.Price = 200M;
            //Assert
            Assert.Equal(100M, p.Price);
        }
    }
}
ProductTests类中有两个单元测试,它们中的每一个都会测试 WorkingWithVisualStudio 项目中Product模型类的不同行为。一个测试项目可以包含很多类,每个类都可以包含多个单元测试。
按照惯例,测试方法的名称描述测试做什么,类的名称描述正在测试的内容。这使得在项目中构造测试和理解所有测试的结果在 Visual Studio 运行时变得更加容易。类名ProductTests表明类包含对于Product类的测试,方法名称表明它们测试更改Product对象名称和价格的能力。
Fact特性被应用于每个方法,以表明它是一个测试。在方法体中,单元测试遵循一种称为 arrange、act、assert(A/A/A)的模式。Arrange 是指设置测试的条件,act 是指执行测试,assert 是指验证结果是否达到预期。
这些测试中的 arrange 和 act 部分是常规的 C# 代码,但 assert 部分由 xUnit.net 处理,它提供了一个名为Assert的类,该类的方法用于检查一个操作的输出是否是符合预期。
提示:
Fact特性和Assert类在Xunit命名空间中定义,它必须在每个测试类中使用using语句引用。
Assert类的方法是静态的,用于在预期结果和实际结果之间执行不同类型的比较。表7-3显示了最常用的Assert方法。
表 7-3:常用的 xUnit.net Assert 方法
| 名称 | 描述 |
|---|---|
| Equal(expected, result) | 此方法断言结果等于预期的结果。该方法有用于比较不同类型和比较集合的重载版本。该方法还有另一个接受额外参数的版本,该参数是一个实现了IEqualityComparer<T>接口(用于对象比较)的对象。 |
| NotEqual(expected, result) | 此方法断言结果不等于预期的结果。 |
| True(result) | 此方法断言结果为true |
| False(result) | 此方法断言结果为false |
| IsType(expected, result) | 此方法断言结果是指定类型 |
| IsNotType(expected, result) | 此方法断言结果不是指定类型 |
| IsNull(result) | 此方法断言结果为空 |
| IsNotNull(result) | 此方法断言结果为非空 |
| InRange(result, low, high) | 此方法断言结果在low和high之间 |
| NotInRange(result, low, high) | 此方法断言结果不在low和high之间 |
| Throws(exception, expression) | 此方法断言指定表达式抛出指定异常类型 |
每个Assert方法都允许进行不同类型的比较,如果结果不是预期的,则抛出异常。异常用于指示测试失败。在清单7-5中的测试中,我使用Equal方法来确定属性值是否被正确地更改。
...
Assert.Equal("New Name", p.Name);
...
Visual Studio 支持通过【测试资源管理器】窗口查找和运行单元测试,可通过【测试】➤【窗口】➤【测试资源管理器】菜单打开它,如图7-4所示。
提示:如果在【测试资源管理器】窗口中看不到单元测试,则生成解决方案。编译触发器发现单元测试的过程。
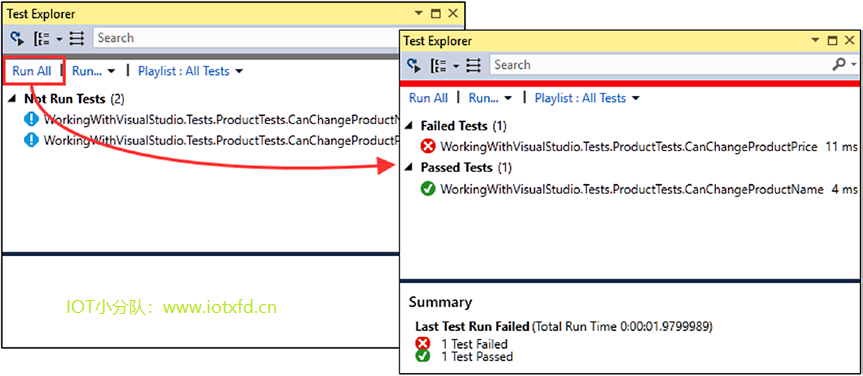 图7-4 Visual Studio 测试资源管理器
单击【测试资源管理器】中的【全部运行】按钮运行测试。Visual Studio 将使用 xUnit.net 运行项目中的测试并显示结果。如前所述,CanChangeProductPrice测试包含一个导致测试失败的错误。问题在于Assert.Equal方法的参数,它将测试结果与原始的价格属性值进行比较,而不是更改后的值。清单7-6纠正了这个问题。
提示:当测试失败时,最好先检查测试的准确性,然后再查看它所针对的组件,特别是如果测试是新的或最近修改过的。
清单 7-6:ProductTests.cs 文件,修正测试
using WorkingWithVisualStudio.Models;
using Xunit;
namespace WorkingWithVisualStudio.Tests
{
    public class ProductTests
    {
        [Fact]
        public void CanChangeProductName()
        {
            // Arrange
            var p = new Product { Name = "Test", Price = 100M };
            // Act
            p.Name = "New Name";
            //Assert
            Assert.Equal("New Name", p.Name);
        }
        [Fact]
        public void CanChangeProductPrice()
        {
            // Arrange
            var p = new Product { Name = "Test", Price = 100M };
            // Act
            p.Price = 200M;
            //Assert
            Assert.Equal(200M, p.Price);
        }
    }
}
如果您有很多测试,那么所有测试都需要一段时间才能完成。为了快速和迭代地工作,【测试资源管理器】窗口为选择要执行的测试子集提供了不同的选项。最有用的子集是一组失败的测试,如图7-5所示。再次运行修正后的测试,【测试资源管理器】将不再出现测试失败。
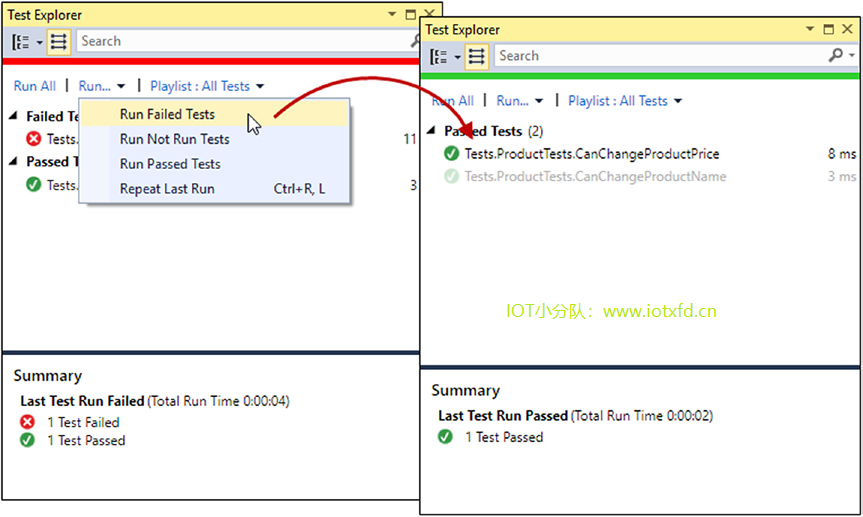 图7-5 有选择的运行测试
为模型类编写单元测试(如产品)是容易的。不仅因为产品类简单,而且它是自包含的,这意味着当在Product对象上执行 action 时,我可以确信我正在测试Product类提供的功能。
MVC 应用程序中的其他组件的情况更加复杂,因为它们之间存在依赖关系。我定义的下一组测试将在控制器上运行,检查控制器和视图之间传递的Product对象序列。
当比较的是从自定义类实例化的对象时,需要使用 xUnit.NET的Assert.Equal方法。该方法接受一个实现了IEqualityComparer<T>接口的参数,从而实现对象的比较。第一步是向单元测试项目中添加一个名为 Comparer.cs 的类文件,并使用它来定义清单7-7所示的助手类。
清单 7-7:WorkingWithVisualStudio.Tests 文件夹下的 Comparer.cs 文件的内容
using System;
using System.Collections.Generic;
namespace WorkingWithVisualStudio.Tests
{
    public class Comparer
    {
        public static Comparer<U> Get<U>(Func<U, U, bool> func)
        {
            return new Comparer<U>(func);
        }
    }
    public class Comparer<T> : Comparer, IEqualityComparer<T>
    {
        private Func<T, T, bool> comparisonFunction;
        public Comparer(Func<T, T, bool> func)
        {
            comparisonFunction = func;
        }
        public bool Equals(T x, T y)
        {
            return comparisonFunction(x, y);
        }
        public int GetHashCode(T obj)
        {
            return obj.GetHashCode();
        }
    }
}
这些类将允许我使用 lambda 表达式创建IEqualityComparer<T>对象,而无需为我想要进行比较的每种类型定义一个新的类。这并不是必需的,但它将简化我的单元测试类中的代码,并使它们更易于阅读和维护。
现在可以很轻易地进行比较了,也可以说明应用程序中组件之间的依赖关系问题。我在 WorkingWithVisualStudio.Tests 项目中添加了一个名为 HomeControllerTests.cs 的新类,用于定义如清单7-8所示的单元测试。
清单 7-8:WorkingWithVisualStudio.Tests 文件夹下的 The HomeControllerTests.cs 文件
using Microsoft.AspNetCore.Mvc;
using System.Collections.Generic;
using WorkingWithVisualStudio.Controllers;
using WorkingWithVisualStudio.Models;
using Xunit;

namespace WorkingWithVisualStudio.Tests
{
    public class HomeControllerTests
    {
        [Fact]
        public void IndexActionModelIsComplete()
        {
            // Arrange
            var controller = new HomeController();
            // Act
            var model = (controller.Index() as ViewResult)?.ViewData.Model
                as IEnumerable<Product>;
            // Assert
            Assert.Equal(SimpleRepository.SharedRepository.Products, model,
                Comparer.Get<Product>((p1, p2) => p1.Name == p2.Name
                    && p1.Price == p2.Price));
        }
    }
}
清单中的单元测试检查Index action 方法是否将存储库中的所有对象传递给视图。(暂时忽略测试中的 act 部分,我在第17章中解释了ViewResult类及其在 MVC 应用程序中所扮演的角色。目前,只需知道我正在获得Index action 方法返回的模型数据。)
如果运行测试,您将看到测试失败,这表明存储库中的对象集与Index方法返回的对象集不同。但是,当找出测试失败的原因时,有一个问题:测试应该作用于 Home 控制器,但是控制器类依赖于SimpleRepository类,很难弄清楚测试是显示了它要针对的类的问题,还是显示了应用程序的另一部分的问题。
示例应用程序非常简单,只要看一下HomeController和SimpleRepository类的代码,就可以很容易地解决问题。在实际的应用程序中,可视化检查并不是那么容易,因为依赖链会使您很难理解是什么导致了测试失败。通常,存储库依赖于某种类型的持久存储系统,例如数据库,以及提供对其访问的库,单元测试可以对整个复杂组件链起作用,这些组件中的任何一个都可能导致问题。
当单元测试针对应用程序的小部分时是有效的,例如单个方法或类。我需要的是能够将 Home 控制器与应用程序的其余部分隔离开来,这样我就可以限制测试的范围并排除存储库造成的任何影响。
隔离组件的关键在于使用 C# 接口。为将控制器从存储库分离,我在 Models 文件夹下添加了一个名为 IRepository.cs 的新类,用于定义清单 7-9所示的接口。
清单 7-9:Models 文件夹下的 IRepository.cs 文件的内容
using System.Collections.Generic;

namespace WorkingWithVisualStudio.Models
{
    public interface IRepository
    {
        IEnumerable<Product> Products { get; }
        void AddProduct(Product p);
    }
}
这个接口没有什么特别之处(除了它没有定义 Web 应用程序中通常需要的完整操作集;更真实和完整的示例请参见第8章)。尽管如此,添加这样的接口使我可以很容易地隔离一个组件进行测试。第一步是更新SimpleRepository类,以便它实现新的接口,如清单7-10所示。
清单 7-10:Models 文件夹下的 SimpleRepository.cs 文件,实现接口
using System.Collections.Generic;
namespace WorkingWithVisualStudio.Models
{
    public class SimpleRepository : IRepository
    {
        private static SimpleRepository sharedRepository = new SimpleRepository();
        private Dictionary<string, Product> products
            = new Dictionary<string, Product>();
        public static SimpleRepository SharedRepository => sharedRepository;
        public SimpleRepository()
        {
            var initialItems = new[] {
                new Product { Name = "Kayak", Price = 275M },
                new Product { Name = "Lifejacket", Price = 48.95M },
                new Product { Name = "Soccer ball", Price = 19.50M },
                new Product { Name = "Corner flag", Price = 34.95M }
            };
            foreach (var p in initialItems)
            {
                AddProduct(p);
            }
            products.Add("Error", null);
        }
        public IEnumerable<Product> Products => products.Values;
        public void AddProduct(Product p) => products.Add(p.Name, p);
    }
}
下一步是更改控制器,以便用于引用存储库的属性使用接口而不是类型,如清单7-11所示。
提示:ASP.NET Core MVC 支持一个更优雅的方法来解决此类问题,称为依赖注入,我将在第18章描述。依赖注入常常导致混淆,所以本章我使用更为简单、更为手动的方式隔离组件。
清单 7-11:Controller 文件夹下的 HomeController.cs 文件,添加存储库属性
using Microsoft.AspNetCore.Mvc;
using WorkingWithVisualStudio.Models;
using System.Linq;

namespace WorkingWithVisualStudio.Controllers
{
    public class HomeController : Controller
    {
        public IRepository Repository = SimpleRepository.SharedRepository;
        public IActionResult Index() => View(Repository.Products
            .Where(p => p?.Price < 50));
        [HttpGet]
        public IActionResult AddProduct() => View(new Product());
        [HttpPost]
        public IActionResult AddProduct(Product p)
        {
            Repository.AddProduct(p);
            return RedirectToAction("Index");
        }
    }
}
这似乎不是一个有意义的改变,但它允许我在测试期间更改控制器使用的存储库,这就是我可以隔离控制器的方法。在清单7-12中,我更新了控制器单元测试,以便他们使用存储库的一个特殊版本。
清单 7-12:HomeControllerTests.cs 文件,在单元测试中隔离控制器
using Microsoft.AspNetCore.Mvc;
using System.Collections.Generic;
using WorkingWithVisualStudio.Controllers;
using WorkingWithVisualStudio.Models;
using Xunit;

namespace WorkingWithVisualStudio.Tests
{
    public class HomeControllerTests
    {
        class ModelCompleteFakeRepository : IRepository
        {
            public IEnumerable<Product> Products { get; } = new Product[]
            {
                new Product { Name = "P1", Price = 275M },
                new Product { Name = "P2", Price = 48.95M },
                new Product { Name = "P3", Price = 19.50M },
                new Product { Name = "P3", Price = 34.95M }
            };

            public void AddProduct(Product p)
            {
                // do nothing - not required for test
            }
        }
        [Fact]
        public void IndexActionModelIsComplete()
        {
            // Arrange
            var controller = new HomeController();
            controller.Repository = new ModelCompleteFakeRepository();
            // Act
            var model = (controller.Index() as ViewResult)?.ViewData.Model
            as IEnumerable<Product>;
            // Assert
            Assert.Equal(controller.Repository.Products, model,
            Comparer.Get<Product>((p1, p2) => p1.Name == p2.Name
            && p1.Price == p2.Price));
        }
    }
}
我定义了一个伪IRepository接口实现,它只实现了测试所需的属性,并且使用的测试数据总是一致的(在使用真正的数据库时可能不是这样的情况,特别是当您与其他开发人员共享数据库时,这些开发人员将进行自己的更改。)。
修正后的单元测试仍然失败,这表明该问题是由HomeController类中的Index action 方法引起的,而不是它所依赖的组件。单元测试所执行的 action 方法非常简单,从检查中可以看出问题是显而易见的。
...
public IActionResult Index() => View(Repository.Products.Where(p => p.Price < 50));
...
这个问题是由 LINQ 的Where方法导致的,它用于筛选所有Price属性值大于等于50的Product对象。对于问题的原因,我有一个可靠的线索,但是在纠正之前创建一个确认问题的测试是很好的做法,如清单7-13所示。
提示:在这些测试中有很多重复。我将在下一节中描述如何简化测试。
清单 7-13:WorkingWithVisualStudio.Tests 文件夹下的 HomeControllerTests.cs,添加一个测试
using Microsoft.AspNetCore.Mvc;
using System.Collections.Generic;
using WorkingWithVisualStudio.Controllers;
using WorkingWithVisualStudio.Models;
using Xunit;

namespace WorkingWithVisualStudio.Tests
{
    public class HomeControllerTests
    {
        class ModelCompleteFakeRepository : IRepository
        {
            public IEnumerable<Product> Products { get; } = new Product[]
            {
                new Product { Name = "P1", Price = 275M },
                new Product { Name = "P2", Price = 48.95M },
                new Product { Name = "P3", Price = 19.50M },
                new Product { Name = "P3", Price = 34.95M }
            };

            public void AddProduct(Product p)
            {
                // do nothing - not required for test
            }
        }
        [Fact]
        public void IndexActionModelIsComplete()
        {
            // Arrange
            var controller = new HomeController();
            controller.Repository = new ModelCompleteFakeRepository();
            // Act
            var model = (controller.Index() as ViewResult)?.ViewData.Model
            as IEnumerable<Product>;
            // Assert
            Assert.Equal(controller.Repository.Products, model,
            Comparer.Get<Product>((p1, p2) => p1.Name == p2.Name
            && p1.Price == p2.Price));
        }
        class ModelCompleteFakeRepositoryPricesUnder50 : IRepository
        {
            public IEnumerable<Product> Products { get; } = new Product[]
            {
                new Product { Name = "P1", Price = 5M },
                new Product { Name = "P2", Price = 48.95M },
                new Product { Name = "P3", Price = 19.50M },
                new Product { Name = "P3", Price = 34.95M }
            };
            public void AddProduct(Product p)
            {
                // do nothing - not required for test
            }
        }
        [Fact]
        public void IndexActionModelIsCompletePricesUnder50()
        {
            // Arrange
            var controller = new HomeController();
            controller.Repository = new ModelCompleteFakeRepositoryPricesUnder50();
            // Act
            var model = (controller.Index() as ViewResult)?.ViewData.Model
            as IEnumerable<Product>;
            // Assert
            Assert.Equal(controller.Repository.Products, model,
            Comparer.Get<Product>((p1, p2) => p1.Name == p2.Name
            && p1.Price == p2.Price));
        }
    }
}
我定义了一个新的伪存储库,它只包含价格低于50的Product对象,并在新的测试中使用它。如果您运行这个测试,将看到它成功了,此时可知,这个问题是由在Index action 方法中使用Where方法引起的。
在实际项目中,理解测试失败原因的关键点在于您需要将测试的目的与应用程序的规范协调一致的点。很可能是这样,即Index方法假定按Price筛选Product对象,在这种情况下,需要修改测试。这是一个常见的结果,失败的测试并不总是指示应用程序中的真正问题。另一方面,如果Index action 方法不应该筛选模型对象,那么需要进行纠正,如清单7-14所示。
理解测试驱动开发
译者注:这里所说的驱动并非硬件驱动程序的那个驱动,而是通过测试来驱动开发的进行。
我遵循了本章中最常用的单元测试风格,其中编写了一个应用程序功能,然后进行测试,以确保它按需要工作。这很流行,因为大多数开发人员首先考虑的是应用程序代码,其次是测试(这是我的观点)。
这种方法的问题在于,它倾向于生成单元测试,这些测试只关注应用程序代码中难以编写或需要进行一些认真调试的部分,而功能的某些方面只进行了部分测试或完全不测试。
另一种方法是测试驱动开发(TDD),TDD 有很多不同的版本,但核心思想是在实现功能本身之前为功能编写测试。首先编写测试会让您更仔细地考虑您正在实现的规范,以及如何知道某个特性已经正确实现,而不是深入研究实现细节,TDD 还会让您预先考虑成功或失败的衡量标准。
您编写的测试一开始都会失败,因为您的新功能并未实现。但是,当您向应用程序添加代码时,您的测试将逐渐从红色迁移到绿色,并且所有的测试都将在功能完成时通过。TDD 需要遵守准则,但是它确实产生了一组更全面的测试,并且可以产生更健壮和可靠的代码。
清单 7-14:Controllers 文件夹下的 HomeController.cs 文件,移除 LINQ 过滤
using Microsoft.AspNetCore.Mvc;
using WorkingWithVisualStudio.Models;
using System.Linq;

namespace WorkingWithVisualStudio.Controllers
{
    public class HomeController : Controller
    {
        public IRepository Repository = SimpleRepository.SharedRepository;
        public IActionResult Index() => View(Repository.Products);
        [HttpGet]
        public IActionResult AddProduct() => View(new Product());
        [HttpPost]
        public IActionResult AddProduct(Product p)
        {
            Repository.AddProduct(p);
            return RedirectToAction("Index");
        }
    }
}
如果再次运行测试,您将看到所有测试通过,如图7-6所示。
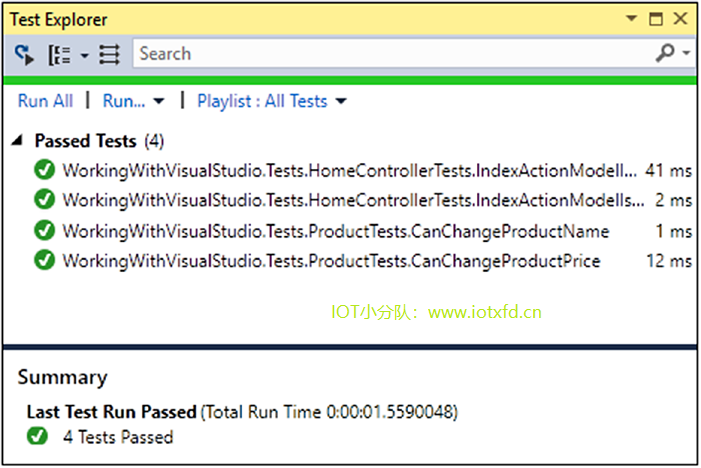 图7-6 通过所有测试
对于这样一个简单的问题,似乎需要做大量的工作,但在实际应用程序中,测试特定组件的能力是必不可少的。只有当您能够有效地隔离组件时,才有可能达到确定问题并编写测试来验证修复的目的。
上一节介绍了在 Visual Studio 中编写单元测试和运行测试的基本方法,并强调了隔离正在测试的组件的重要性。在本节中,我将介绍一些更高级的工具和特性,您可以使用这些工具和特性编写更简洁、更有表现力的测试。如果您沉浸在单元测试的文化中,最终会产生大量的测试代码,此时代码的清晰性变得非常重要,特别是在开发和维护过程中,当您需要修改测试以反映它们在应用程序中的变化时。
我为HomeController类编写的测试揭示了一个仅针对某些数据值的问题。为了测试这种情况,我创建了两个类似的测试,每个测试都有自己的伪存储库。这是一种重复的方法,特别是因为这些测试之间的唯一区别是用于伪存储库中Product对象的Price属性的一组decimal值。
xUnit.net 提供了对参数化测试的支持,当从测试中删除了测试中使用的数据时,就可以为多个测试使用单个方法。在清单7-15中,我使用了参数化的测试功能来删除HomeController类测试中的重复代码。
清单 7-15:测试项目中的 HomeControllerTests.cs 文件,参数化单元测试
using Microsoft.AspNetCore.Mvc;
using System.Collections.Generic;
using WorkingWithVisualStudio.Controllers;
using WorkingWithVisualStudio.Models;
using Xunit;
namespace WorkingWithVisualStudio.Tests
{
    public class HomeControllerTests
    {
        class ModelCompleteFakeRepository : IRepository
        {
            public IEnumerable<Product> Products { get; set; }
            public void AddProduct(Product p)
            {
                // do nothing - not required for test
            }
        }
        [Theory]
        [InlineData(275, 48.95, 19.50, 24.95)]
        [InlineData(5, 48.95, 19.50, 24.95)]
        public void IndexActionModelIsComplete(decimal price1, decimal price2,
        decimal price3, decimal price4)
        {
            // Arrange
            var controller = new HomeController();
            controller.Repository = new ModelCompleteFakeRepository
            {
                Products = new Product[] {
                    new Product {Name = "P1", Price = price1 },
                    new Product {Name = "P2", Price = price2 },
                    new Product {Name = "P3", Price = price3 },
                    new Product {Name = "P4", Price = price4 },
                }
            };
            // Act
            var model = (controller.Index() as ViewResult)?.ViewData.Model
                as IEnumerable<Product>;
            // Assert
            Assert.Equal(controller.Repository.Products, model,
                Comparer.Get<Product>((p1, p2) => p1.Name == p2.Name
                    && p1.Price == p2.Price));
        }
    }
}
参数化单元测试使用的是Theory特性,而不是用于标准测试的Fact特性。我还使用了InlineData特性,它允许我为单元测试方法定义的参数指定值。C# 限制了用特性表示数据值的方式,因此我在测试方法上定义了四个decimal参数,并使用InlineData属性为它们提供值。我使用测试方法中的decimal值来生成Product对象数组,用于设置伪存储库对象的Products属性。
每个Inline特性定义一个单独的单元测试,在 Visual Studio 【测试资源管理器】中显示为一个不同的项,如图7-7所示。【测试资源管理器】条目显示将用于单元测试方法参数的值。
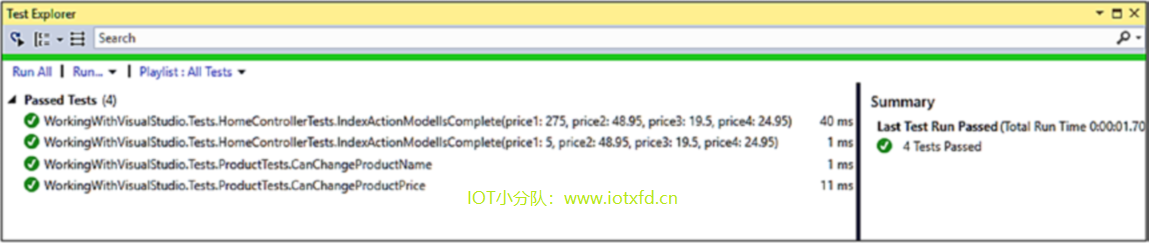 图7-7 Visual Studio 【测试资源管理器】中的参数化测试
在特性中表达数据限制了InlineData特性的有效性,但另一种替代方法是创建返回测试所需对象的静态方法或属性。在这种情况下,定义数据的方式没有限制,您可以创建范围更广的测试值。为了演示它是如何工作的,我向单元测试项目中添加了一个名为ProductTestData.cs的类文件,并使用它来定义清单7-16所示的类。
清单 7-16:WorkingWithVisualStudio.Tests 文件夹下的 ProductTestData.cs 文件的内容
using System.Collections;
using System.Collections.Generic;
using WorkingWithVisualStudio.Models;
namespace WorkingWithVisualStudio.Tests
{
    public class ProductTestData : IEnumerable<object[]>
    {
        public IEnumerator<object[]> GetEnumerator()
        {
            yield return new object[] { GetPricesUnder50() };
            yield return new object[] { GetPricesOver50 };
        }
        IEnumerator IEnumerable.GetEnumerator()
        {
            return this.GetEnumerator();
        }
        private IEnumerable<Product> GetPricesUnder50()
        {
            decimal[] prices = new decimal[] { 275, 49.95M, 19.50M, 24.95M };
            for (int i = 0; i < prices.Length; i++)
            {
                yield return new Product { Name = $"P{i + 1}", Price = prices[i] };
            }
        }
        private Product[] GetPricesOver50 => new Product[]
        {
            new Product { Name = "P1", Price = 5 },
            new Product { Name = "P2", Price = 48.95M },
            new Product { Name = "P3", Price = 19.50M },
            new Product { Name = "P4", Price = 24.95M }
        };
    }
}
测试数据由一个实现了IEnumerable<object[]>接口的类提供,它返回一系列对象数组。序列中的每个对象数组包含一组参数,这些参数将传递给测试方法。我将重新定义我的测试方法,以便它接受一个Product对象数组,这将为测试数据添加另一个层。该层是对象数组的枚举,每个数组都包含一个Product对象数组。测试数据中的这种深度结构可能令人困惑,但重要的是要正确处理,因为如果 Xunit.net 试图传递给测试方法的参数数量与方法签名不匹配,那么测试将无法工作。
我喜欢构造自己的测试数据类,使用私有方法或属性定义单独的测试数据集合,然后通过GetEnumerator方法将测试数据组合为对象数组的序列。为了演示不同技术,我分别使用方法和属性创建了Product对象数组,但是我更倾向于在自己的项目中使用其中一种方法(使用哪一种是由我正在测试的数据类型决定的)。清单7-17展示了如何使用带有Theory特性的测试数据类来构建测试。
提示:如果想将测试数据与单元测试包含在同一个类中,则可以使用
MemberData特性而不是ClassData。MemberData特性使用一个字符串进行配置,该字符串指定将提供IEnumerable<object[]>的静态方法的名称,序列中的每个对象数组都是测试方法的一组参数。
清单 7-17:测试项目中的 HomeControllerTests.cs 文件,使用测试数据类
using Microsoft.AspNetCore.Mvc;
using System.Collections.Generic;
using WorkingWithVisualStudio.Controllers;
using WorkingWithVisualStudio.Models;
using Xunit;
namespace WorkingWithVisualStudio.Tests
{
    public class HomeControllerTests
    {
        class ModelCompleteFakeRepository : IRepository
        {
            public IEnumerable<Product> Products { get; set; }
            public void AddProduct(Product p)
            {
                // do nothing - not required for test
            }
        }
        [Theory]
        [ClassData(typeof(ProductTestData))]
        public void IndexActionModelIsComplete(Product[] products)
        {
            // Arrange
            var controller = new HomeController();
            controller.Repository = new ModelCompleteFakeRepository
            {
                Products = products
            };
            // Act
            var model = (controller.Index() as ViewResult)?.ViewData.Model
            as IEnumerable<Product>;
            // Assert
            Assert.Equal(controller.Repository.Products, model,
            Comparer.Get<Product>((p1, p2) => p1.Name == p2.Name
            && p1.Price == p2.Price));
        }
    }
}
ClassData特性配置为测试数据类的类型,本例为ProductTestData。当测试运行时,Xunit.net 将创建ProductTestData类的一个新实例,并使用它获取测试数据序列用于测试。
注意:如果您查看【测试资源管理器】中的测试列表,您将看到
IndexActionModelIsComplete测试只有一个条目,即使ProductTestData类提供了两组测试数据。当测试数据对象不能序列化并且可以通过向测试对象应用Serializable特性来解析时,就会发生这种情况。
有效地隔离组件需要类的伪实现来提供测试数据或检查组件的行为方式。在前面的示例中,我创建了一个实现IRepository接口的类。这可能是一种有效的方法,但它确实为您要运行的每种测试创建了实现类。例如,清单7-18添加了一个测试,该测试检查Index action 方法是否只调用了存储库中的Products方法一次。(当组件对存储库进行重复查询,导致多个存储库查询时,这种测试是常见的。)
清单 7-18:测试文件夹下的 HomeControllerTests.cs 文件,添加单元测试
using Microsoft.AspNetCore.Mvc;
using System.Collections.Generic;
using WorkingWithVisualStudio.Controllers;
using WorkingWithVisualStudio.Models;
using Xunit;
namespace WorkingWithVisualStudio.Tests
{
    public class HomeControllerTests
    {
        class ModelCompleteFakeRepository : IRepository
        {
            public IEnumerable<Product> Products { get; set; }
            public void AddProduct(Product p)
            {
                // do nothing - not required for test
            }
        }
        [Theory]
        [ClassData(typeof(ProductTestData))]
        public void IndexActionModelIsComplete(Product[] products)
        {
            // Arrange
            var controller = new HomeController();
            controller.Repository = new ModelCompleteFakeRepository
            {
                Products = products
            };
            // Act
            var model = (controller.Index() as ViewResult)?.ViewData.Model
            as IEnumerable<Product>;
            // Assert
            Assert.Equal(controller.Repository.Products, model,
            Comparer.Get<Product>((p1, p2) => p1.Name == p2.Name
            && p1.Price == p2.Price));
        }
        class PropertyOnceFakeRepository : IRepository
        {
            public int PropertyCounter { get; set; } = 0;
            public IEnumerable<Product> Products
            {
                get
                {
                    PropertyCounter++;
                    return new[] { new Product { Name = "P1", Price = 100 } };
                }
            }
            public void AddProduct(Product p)
            {
                // do nothing - not required for test
            }
        }
        [Fact]
        public void RepositoryPropertyCalledOnce()
        {
            // Arrange
            var repo = new PropertyOnceFakeRepository();
            var controller = new HomeController { Repository = repo };
            // Act
            var result = controller.Index();
            // Assert
            Assert.Equal(1, repo.PropertyCounter);
        }
    }
}
伪实现并不总是简单的数据源;它们还可以用来评估组件执行其工作的方式。在本例中,我添加了一个简单的计数器属性,每次读取伪存储库的Products属性时,该属性都会递增,并且我使用Assert.Equal方法确保只调用该属性一次。
创建这样的伪对象会失控,而控制一切的最好方法就是使用一个伪框架,也称为模拟框架(伪对象和模拟对象之间有技术上的区别,但是现代测试工具为了便于使用而将它们混淆在一起,所以我将交替使用这些术语)。我在本章中使用的框架称为 Moq,表7-4对其进行了描述。
表 7-4:Moq 简述
| 问题 | 回答 |
|---|---|
| 它是什么? | Moq 是一个软件包,它用于在应用程序中创建组件的伪实现 |
| 它有什么用? | 模拟框架使伪组件的创建更为容易,它将应用程序的各部分隔离以进行单元测试。 |
| 如何使用它? | Moq 使用 lambda 表达式来定义假组件的功能,并且只需要定义用于测试的功能。 |
| 它有什么缺陷和限制? | 习惯语法需要付出一些努力。请参考https://github.com/Moq/moq4获取文档和示例 |
| 有没有别的选择? | 有几个框架可供选择,包括 NSubstitute(http://nsubstitute.github.io)和 FakeItEasy(http://fakeiteasy.github.io)。所有这些框架都提供了类似的功能,在它们之间进行选择是一个选择您喜欢的语法的问题。 |
要安装 Moq,在【解决方案资源管理器】中右键单击 WorkingWithVisualStudio.Tests 项目,在弹出菜单中选择【管理 NuGet 程序包】。单击【浏览】并在搜索框中输入“Moq”。在包列表中选择【Moq】,如图7-8所示,并单击【安装】将包添加进项目。
注意:Moq 包是添加进单元测试项目,而不是应用程序项目
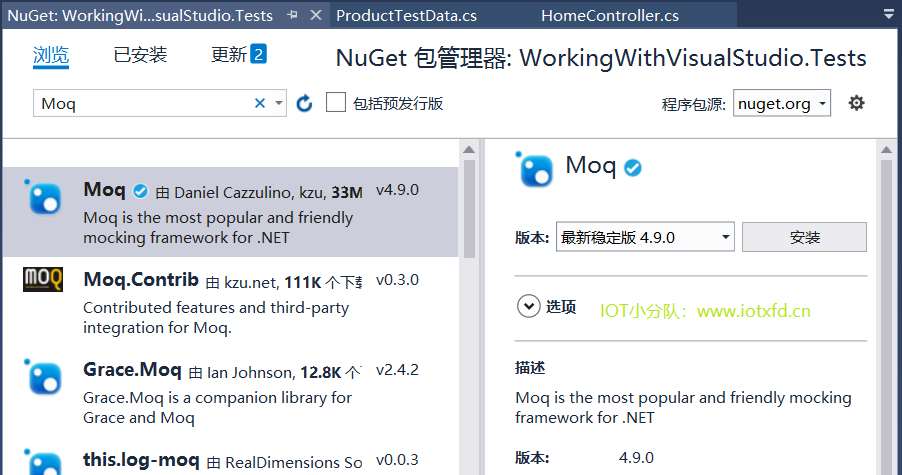 图7-8 将程序包添加进单元测试项目
Visual Studio 安装完成后,关闭 NuGet 包管理器窗口。
创建一个模拟对象意味着告诉 Moq 您想要什么样的对象,配置它的行为,并将对象应用到测试的主题上。在清单7-19中,我使用 Moq 替换了 HomeController 测试中的两个伪存储库。
清单 7-19:在 HomeControllerTests.cs 文件中使用模拟对象
using Microsoft.AspNetCore.Mvc;
using System.Collections.Generic;
using WorkingWithVisualStudio.Controllers;
using WorkingWithVisualStudio.Models;
using Xunit;
using System;
using Moq;
namespace WorkingWithVisualStudio.Tests
{
    public class HomeControllerTests
    {
        [Theory]
        [ClassData(typeof(ProductTestData))]
        public void IndexActionModelIsComplete(Product[] products)
        {
            // Arrange
            var mock = new Mock<IRepository>();
            mock.SetupGet(m => m.Products).Returns(products);
            var controller = new HomeController { Repository = mock.Object };
            // Act
            var model = (controller.Index() as ViewResult)?.ViewData.Model
                as IEnumerable<Product>;
            // Assert
            Assert.Equal(controller.Repository.Products, model,
                Comparer.Get<Product>((p1, p2) => p1.Name == p2.Name
                    && p1.Price == p2.Price));
        }
        [Fact]
        public void RepositoryPropertyCalledOnce()
        {
            // Arrange
            var mock = new Mock<IRepository>();
            mock.SetupGet(m => m.Products)
                .Returns(new[] { new Product { Name = "P1", Price = 100 } });
            var controller = new HomeController { Repository = mock.Object };
            // Act
            var result = controller.Index();
            // Assert
            mock.VerifyGet(m => m.Products, Times.Once);
        }
    }
}
Moq 的使用让我能够删除IRepository接口的伪实现,并将它们替换为几行代码。我不打算详细介绍 Moq 支持的不同特性,但我将解释我在示例中使用 Moq 的方式。(参考https://github.com/Moq/moq4获取 Moq 的文档和示例。之后中的章节在我解释如何对不同类型的 MVC 组件进行单元测试时,也会有一些例子。)
第一步是为Mock对象创建一个新的实例,指定要实现的接口,如下:
...
var mock = new Mock<IRepository>();
...
我所创建的Mock对象将伪造IRepository接口。下一步是定义测试所需的功能。与常规的接口类实现不同,模拟对象只配置测试所需的行为。对于第一个模拟存储库,我需要实现Product属性,以便它返回通过ClassData特性传递给测试方法的一组Product对象,如下所示:
...
mock.SetupGet(m => m.Products).Returns(products);
...
SetupGet方法用于实现属性的 get 访问器。该方法的参数是一个 lambda 表达式,它指定要实现的属性,本例为Products。在SetupGet方法的结果上调用Returns方法,以指定在读取属性值时将返回的结果。对于第二个模拟存储库,我使用了相同的方法,但指定了一个固定值,如下所示:
...
mock.SetupGet(m => m.Products)
.Returns(new[] { new Product { Name = "P1", Price = 100 } });
...
Mock类定义一个Object属性,该属性返回实现指定接口的对象和已定义的行为。在这两个单元测试中,我使用Object属性获取存储库来配置控制器,如下所示:
...
var controller = new HomeController { Repository = mock.Object };
...
我使用的最后一个 Moq 特性是检查是否只调用了一次Products属性,如下所示:
...
mock.VerifyGet(m => m.Products, Times.Once);
...
VerifyGet方法是Mock类定义的方法之一,用于在测试完成后检查模拟对象的状态。在本例中,VerifyGet方法允许我检查读取Products属性方法的次数。如果未正确读取属性一次,Times.Once值则指示VerifyGet方法应抛出异常,最终导致测试失败。(测试中经常使用Assert方法在测试失败时抛出异常,这就是为什么在使用模拟对象时可以使用VerifyGet方法来替换Assert方法的原因。)
本章聚焦于单元测试,它可以成为提高代码质量的强大工具。单元测试并非适合所有开发人员,但它是值得尝试的,即使只用于复杂功能或问题诊断,也是有帮助的。我描述了 xUnit.net 测试框架的使用,解释了隔离组件对测试的重要性,并演示了一些简化单元测试代码的工具和技术。在下一章中,我将开始创建一个更现实的 MVC 应用程序,称为运动商店。
;